


Roasting your chicken:
So, by now your bird should have been brining for a good many hours. If not, start with the recipe for brining in the previous post. Drain your bird (ie, pour the whole mess, brine and bird, into a colander and let the brine run down the drain. The brine has served its purpose. Make sure you bleach out your sink after draining).
The next step is trussing. Luckily all of the birds that I buy from my local whole foods market are pre-trussed like this guy right here.
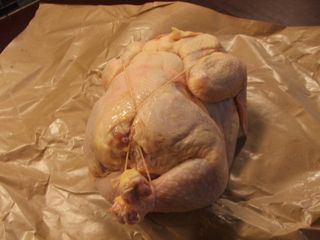
That saves a ton of time, and I think trussing is just messy — I always feel like I’m flinging around raw chicken, which is something that you don’t want to do. By the way folks, make sure to wash your hands often when you mess with a raw bird. Need to learn how to truss a chicken? let this guy tell you:
Trussing a Chicken Tips & Techniques—powered by eHow.com
The reason you want to truss a chicken is to pull everything tight into a little package so that it cooks more evenly. Once you’ve got your bird bundled, set it in a roasting pan and make your rub. This is what I like in my rub:
black pepper, thyme, lemon zest, garlic salt, smoked paprika (Once again, whatever floats your boat as far as flavor goes. Think about what you like to eat with chicken and go for it. It’s hard to screw up).
First, pre-heat your oven to 400 degrees.
Ok, so if you are going with my rub, grind some pepper into a bowl, just a couple of tablespoons.
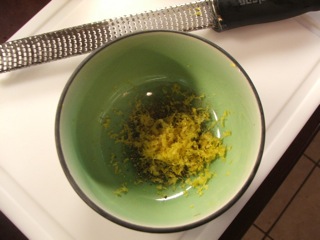
Next, zest a lemon into the bowl. Hopefully you have a microplane. If not, go get one. They rock for grating hard cheeses, citrus, chocolate, whatever. Set the lemon aside — you’re going to stuff it in your bird with some onion or garlic, or whatever juicy ingredients you have sitting around that go with poultry, like celery, carrots, apples, etc.
Add a tablespoon of smoked paprika. If you find this difficult to source, join the club. I order mine online, but you will probably be able to find some in your local specialty store. Regular paprika is just fine, I just like the smokiness—it kind of gives the chicken a rotisserie flavor.
Add some chopped fresh herbs if you have them. If you don’t go grab some pots, some starts and some soil and get on it! I have thyme all over my yard. It’s a great, hardy and drought-tolerant ground cover.
Add some olive oil, I’d say about 1/2 a cup.
Stir to make a paste.
For the stuffing that’s going to fill up your bird and give it flavor, cut a lemon into quarters, then also quarter half an onion. That’s likely all that you will need. If you still have room after you stuff that into your chicken cavity, you can always add some garlic cloves.
Throw that all together in a bowl, then add a couple of spoonfuls of your paste and mix. Skip this step if you don’t feel like doing it. It’s almost just a ritual for me.
Now stuff the chicken!
Place the chicken breast up in the pan.
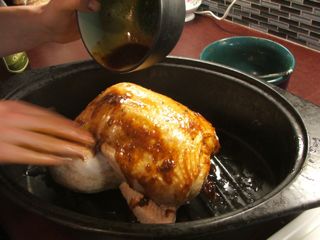
Now rub the chicken with the paste that you made. Don’t forget to keep washing your hands and be careful of cross-contamination! I like to sprinkle the garlic salt over the top of the bird last.
Ready to go…
I’m a cheat. My oven has its own meat probe that plugs into a sensor the oven wall. I set it so that the heat stops when the thermometer says that the chicken is 170 degrees by the thigh bone. You can easily check the temp of your bird as it cooks with any meat thermometer. I am easily distracted and can justify the extra expenditure for the digital probe in the lack of burnt food. At any rate, 170 is the lowest temperature that most cookbooks recommend that you cook chicken. I think that 170 is a perfect temperature for moist meat, even though you might spy a tiny bit of pink near the bones, which is nothing to worry about. Go up to 175-180 if you like your bird a bit dryer around the breast, the dark meat falling off the bone. My big bird took a little over an hour to get to where I thought it was perfect. Again, make sure that you stick your thermometer in the thickest part of the thigh, right down near the bone. The Joy of Cooking says to figure 1 hour for the first 4 pounds, an extra 8 minutes for each additional pound. If your bird weighs less than four pounds, make sure to check it earlier.
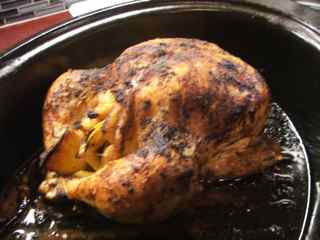
The finished product! Let it rest so that all of the juice doesn’t run out when you slice into it…about 20 minutes.
Before you comment
The comments section is here to provide a platform for civil dialogue on the issues we face together as a local community. Xpress is committed to offering this platform for all voices, but when the tone of the discussion gets nasty or strays off topic, we believe many people choose not to participate. Xpress editors are determined to moderate comments to ensure a constructive interchange is maintained. All comments judged not to be in keeping with the spirit of civil discourse will be removed and repeat violators will be banned. See here for our terms of service. Thank you for being part of this effort to promote respectful discussion.